Tuesday, October 31, 2017

See the Future with Facebook

The future of technology that is. More specifically--purchasing event tickets with your Facebook account. Ticketing platform SeatGeek has signed Facebook up as a distribution partner, allowing sports fans and concert-goers to buy tickets directly through the world’s biggest social network. The company's goal with this partnership is to increase discovery of live events by using the power of the open web; putting tickets where fans are already spending time online.


For Facebook, this partnership serves as yet another conduit to increase its stickiness and ensure people stay on the site. It’s similar to tie-ups Facebook previously announced with Eventbrite and Ticketmaster. And for SeatGeek, known as an aggregator and secondary ticketing marketplace for resellers, it’s a major step forward in terms of encouraging other companies to adopt its primary ticketing API, as Facebook has one of the biggest reaches of any platform on earth.

How is this partnership going to play out exactly? Here are some examples. A ride-sharing company may want to sell tickets to events it regularly drives to or a record label may wish to sell to fans through its website. And a sports team may want to leverage SeatGeek to sell its own tickets through Facebook.

The first company to tap this new tie-up between SeatGeek and Facebook is Sporting Kansas City, a soccer team with an average attendance of around 20,000.  SeatGeek was already an official primary ticketing partner of Major League Soccer (MLS), and by extension Sporting Kansas City, which effectively allows a club’s tickets to be sold on any website or application of a team’s choosing, providing the website or app in question is under the organizer’s direct control or in a partnership with SeatGeek. And that is basically what today’s announcement with Facebook is all about — it will allow any company that runs events to sell tickets through SeatGeek on Facebook.

Through this open API approach, the open ticketing ecosystem will create opportunities to increase distribution, empower teams and artists to sell on the platforms of their choice, and eliminate fraud through a process of barcode verification. Basically, SeatGeek Open powers a modern box office that is mobile, flexible, and widely accessible - perfectly built for teams and artists looking to reach more fans and create richer experiences. Next time you're perusing an event to attend, keep your eyes peeled for these tickets at your fingertips and devour the details of the future with Facebook!

Monday, October 30, 2017

Monday Mashups: An Apple A Day

Keeps the doctor away but in this case, definitely not the dentist! These apple recipes are the perfect sweet treats to devour as we head into the holiday season. Give them as a gift, bring them as a dessert, or enjoy them when you simply need a sugar fix! Here are three different ways to transform your every day apples into decadent holiday delights.

Caramel Apple Donuts

caramel apple donut recipe on LaurenConrad.com

Ingredients:

For the donuts:
2 cups cake flour
2 teaspoons baking powder
1 teaspoon salt
1/2 teaspoon cinnamon
3/4 cup sugar
3/4 cup buttermilk
2 eggs
1 tablespoon vanilla
1 drop green gel food coloring
1 apple, diced

For the caramel topping:
1 bag of caramel bits or wrapped caramels
2 tablespoons milk

Toppings:
mini M&Ms
toffee bits
crushed peanuts or almonds
rainbow sprinkles

Instructions:

1. Whisk flour, baking powder, salt, and cinnamon in a medium bowl. In a separate large bowl, whisk sugar, buttermilk, eggs, vanilla and food coloring. Add your dry ingredients into your wet, and whisk just until combined. Try not to over mix or else your batter will be tough. Mix in the diced apples.

2. Butter or spray your donut pan and preheat oven to 350 degrees. Add some donut batter into a large piping bag and fill each donut cavity until they’re 3/4 of the way full. If you don’t have piping bags, don’t worry—use a spoon instead. Piping bags just give you a more even distribution. Bake the donuts for about 8-10 minutes, or until a toothpick comes out clean when inserted.

3. Let the donuts cool in the pan for about a minute, then flip onto your work surface and let cool. Repeat until all your batter is baked.

4. Add your toppings to their own individual bowls so decorating can be as quick as possible.

5. Add the caramel bits or wrapped caramels (make sure to take off the wrapping) and milk to a small saucepan and cook on medium low heat, stirring occasionally until all of the caramels are nice and melted. Turn the heat to the lowest it can go and leave the saucepan over the heat. This helps the caramel not to harden while dipping donuts.

6. Once your caramel is melted, start to dip your donuts into the caramel, one at a time. After dipping each one, quickly sprinkle your topping of choice. Repeat until all donuts are topped.

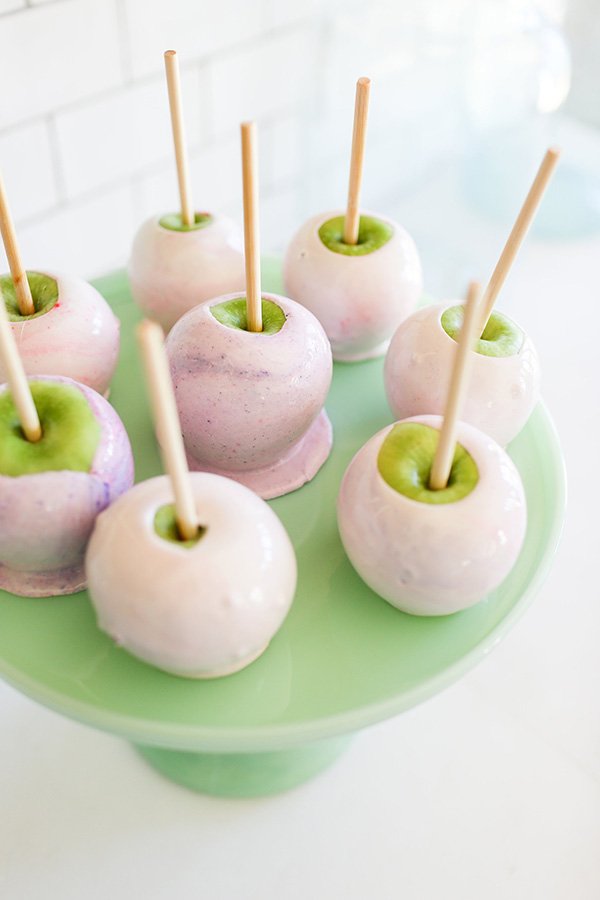
Marbled Candy Apples

A fun spin on traditional candy apples. | LaurenConrad.com

Ingredients:

6 smaller Granny Smith apples
2 cups granulated sugar
3/4 cup water
1/2 cup light corn syrup
unsalted butter or oil spray
2 tablespoons white gel food coloring
2 drops each purple and pink gel food coloring
1 teaspoon clear vanilla extract, or any other favorite flavor clear extract
6 wood apple sticks
candy thermometer

Instructions:

1. Wash and dry your apples and remove all of the stems. Make sure your apples are very clean and completely dry. Air bubbles tend to form when candying apples, and this will help them to not form as many bubbles.

2. Line a baking sheet with parchment paper. Make sure to butter or spray the sheet completely and set aside.

3. Insert wooden sticks about 3/4 of the way down into the apples and set aside. Make sure the rest of your ingredients are next to the stovetop so you can work quickly once the candy mixture is done cooking.

4. In a small saucepan, combine sugar, water and corn syrup, and whisk until combined. Turn your stove on medium-high heat, and place a candy thermometer into the saucepan. Boil the mixture until it reaches the hard crack stage (300 to 308 degrees). Make sure not to whisk the candy mixture at all while it is cooking! Wait until it is about 308 degrees, and then take it off the heat.

5. Immediately add in the white food coloring and vanilla extract and stir until combined. Add in 2 drops each of pink and purple food coloring. With a toothpick, slightly swirl the 4 dots (about 4 swoops). If you swirl too much, the colors will just meld together. Let the candy mixture sit for 30 seconds for the air bubbles to slowly calm down.

6. With your non-dominant hand, tilt the saucepan so the mixture comes to one side. With your other hand, dip and slightly twirl each apple into the candy mixture. Once the apple is completely coated, let the excess candy drip off into the pan for a few seconds. Place the covered apple onto your prepared baking sheet to let harden. Repeat this process until all apples are coated.

Caramel Covered Apple Cider Marshmallows

caramel covered apple cider marshmallows recipe via LaurenConrad.com

Ingredients:

For the apple cider marshmallows:
1 cup spiced apple cider
7 ½ teaspoons gelatin
½ cup water
¾ cup brown sugar
¾ cup sugar
1 cup tapioca/cassava syrup*
¼ teaspoon salt
¼ teaspoon cinnamon
¼ teaspoon allspice
¼ teaspoon cardamom
1 teaspoon vanilla
2 tablespoons cornstarch
2 tablespoons powdered sugar

For the caramel:
2 cups sugar
2 cups heavy cream
1 cup light tapioca/cassava syrup*
½ teaspoon salt
4 ½ tablespoons butter
1 teaspoon vanilla

Instructions:

1. Start by reducing your apple cider for the marshmallows. In a small saucepan, heat your apple cider over medium high heat and simmer until it has reduced to 1/2 cup. Place in the fridge to cool.

2. Combine the cornstarch and powdered sugar in a small bowl.

3. Spray a 13″x9″ pan with oil or butter and cover entirely with the cornstarch and powdered sugar mix. Save a little extra for the tops of the marshmallows.

4. In the bowl of an electric mixer fitted with a whisk attachment, add the cooled reduced apple cider and gelatin and whisk lightly until combined. Set aside to bloom.

5. In a medium saucepan, combine the water, sugars, tapioca syrup, salt, all of the spices and whisk until combined.

6. Turn the heat to medium and let it come to a boil and continue boiling until it reaches 240 degrees. Once it hits 240 degrees, take it off the heat.

7. Turn your mixer onto its slowest speed and break up the bloomed gelatin.

8. With the mixer still running on low, slowly add in the hot sugar mixture. Once it is all added, you can bump the speed up to high and whisk until your mixture is glossy and thick and at least double in size.

9. Add in the vanilla and whisk one more time to incorporate.

10. Working quickly, spread the marshmallow mixture into your prepared pan and spread the top until somewhat smooth.

11. Sprinkle the reserved cornstarch and powdered sugar mixture onto the top and lightly press down with the palms of your hands to smooth the top.

12. Set aside to firm for several hours or overnight.

13. While your marshmallows are cooling, you can make the caramel layer.

14. Heavily spray or butter a baking sheet. Make sure it has sides and is around 12″x18″.

15. In a large saucepan, combine sugar, heavy cream, tapioca syrup, and salt and whisk until combined. Turn the heat to medium and consistently stir, with a wooden spoon, until your mixture is boiling.

16. Once your mixture has started to boil, reduce heat to medium low, stop stirring and let it continue to boil for another 5 minutes.

17. Make sure not to turn up your heat at this point. Making candy requires some patience.

18. Add in the butter and continue to boil until your mixture hits 250 degrees. This will take about 30-45 minutes.

19. Once you’ve hit 250 degrees, take your pan off the heat, add the vanilla in and stir.

20. Carefully and quickly pour your caramel onto your buttered baking sheet. Spread it out as fast as possible until the whole pan (or most of it) is covered. Set aside to cool down for about an hour.

21. Once your marshmallows are firm, pop them out of the pan and cut them into 1-inch strips. Set aside on your work surface.

22. Once your caramel is firm enough to handle, take it off of the baking sheet. I had to run a knife around the edge of the pan to loosen it up a bit.

23. Cover your work surface with parchment paper and turn your caramel over onto it. You’ll want to cut your caramel block into about 3-inch wide strips. But to make sure, you can place one marshmallow strip onto the top of the caramel block, and lightly fold the caramel over onto the marshmallow strip. You want the caramel to be able to cover all sides of the marshmallow.

24. Cut your caramel block into strips.

25. Place one marshmallow strip onto the middle of one caramel strip. Roll the caramel firmly over the marshmallow and pinch hard to seal the edges together.

26. Repeat until all of your caramel is used.

27. Now it is time to cut your logs into small squares. Make sure you use your sharpest knife. You can always refrigerate your logs for about 10 minutes to make cutting a little easier.

28. Wrap your individual caramels in parchment squares for gift giving, or store in an airtight container for up to a week.

These recipes come highly recommended (just not by your dentist)! Enjoy these sweet treats (followed by brushing your teeth) and devour the details of sharing some decadent delights with your friends and family this holiday season!

Thursday, October 26, 2017

Pumpkin Palooza at Lawn on D

Had to highlight one of our favorite places again just in time for Halloween. There is always something to see, do or experience at The Lawn On D. Open daily during designated hours, The Lawn On D provides a colorful collection of public seating and lounge chairs, interactive art exhibitions, assorted games such as bocce and ping-pong, and free Wi-Fi. The Lawn On D is the perfect place to relax, enjoy the South Boston neighborhood, and spend time with friends and family.


This Saturday, October 28th, the 2.7-acre outdoor event space on D Street next to the BCEC will be hosting Pumpkin Palooza 2017! It is the last special family event of The Lawn On D’s 2017 season. Complete with Halloween-themed activities for all ages like pumpkin carving, a costume contest, face painting, train rides and more, followed by live music and a variety of spectacular evening performances, you won't want to miss your last opportunity to hang at the Lawn!

Image result for pumpkins at lawn on d

Plan your Saturday to include this pumpkin party and devour the details of Halloween as The Lawn on D's 2017 season comes to an end. Hope to see you one last time as we swing into 2018 with The Lawn on D!

Wednesday, October 25, 2017

Wedding Wednesdays: Seasons Bridal Show

Back again this year on Sunday, November 5th is our favorite bridal show to attend--Seasons Bridal Show! As you may recall from our previous posts, our best friend Becky is a part-time professional model and she's been working at this event donning wedding gowns for bride-to-bes to check out. This time around, she is a bride-to-be herself so it will be so fun to be there again with her meeting different vendors and sampling sweet treats. We really can't wait!


As excited as we are for Becky to tie the knot, we're also excited for all of our bride-to-be readers to walk down the aisle as well! So if you're in the midst of planning and are searching for vendors and unique ideas, you must attend this exceptional event! Brought to you by Wedding Creators and the recently renovated Hilton Boston-Woburn hotel, the Seasons Bridal Show is the perfect place to see each aspect of your big day come together - regardless of the season.


Did we mention you can enter to win different door prizes? This year, the grand prize giveaway is a 3-night all inclusive trip to Secrets St. James Jamaica (airfare not included). Did we also mention our favorite vendor Janeen Jones will be in attendance? Her hair and makeup skills surpass your ordinary wedding day stylist. With years of experience and features in top modeling photo shoots, you'll be blown away by Janeen's expertise and amazing services! And because Janeen is so awesome (and a great friend to Becky and I), she has offered to give out a free makeup application at her salon to any bride that attends the show and mentions this blog post! This is a huge opportunity for any bride-to-be so please spread the word!

jj-logo

At the bridal show, Wedding Creators' exclusive group of wedding professionals will help you bring into focus the day you've always dreamed of! Talk to the professionals and see samples of:
  • flowers
  • invitations
  • table linens
  • wedding gowns
  • tuxedos
  • dresses
  • photographers and videographers
  • limousines and transportation
  • entertainment
  • wedding cakes
  • makeup & beauty
  • ice sculptures
  • honeymoon planning
...and much much more!

Image may contain: 1 person, smiling, standing, wedding and text

The bridal show is free and open to the public, they just request you register online ahead of time here! For more information, visit the Wedding Creators website and Facebook page. Let us know if you'll be attending and join us as we devour the details of the 2017 Seasons Bridal Show!

Tuesday, October 24, 2017

Ice Ice Baby: 3 Unique Ways to Cool Things Down at Your Holiday Party

Alright stop, collaborate and listen: the holidays are right around the corner! For those of you that host your families year after year, we have some unique ways to "keep things chill" at your seasonal celebration. Check out these easy DIY icy items that your guests will truly appreciate. Cheers!

Ice, Ice Bucket

Ice bucket made from ice with berries and branches frozen inside.  Love it!

Keep your wine and champagne chilled all night long in this beautiful solid-ice bucket. Using ingredients like rosemary and cranberries to freeze within the ice gives the bucket a true holiday season feeling!

Floral Ice Cubes

#Cocoscollections:   Champagne Bucket of Floral Ice Cubes

Fill your ice bucket with this frozen floral arrangement! Your guests will love this beautiful display and how cold it keeps the rosé!

Frosty Shots

Make holiday shot glasses - ice shot glasses - diy shot glasses - holiday entertaining ideas - winter bridal shower ideas - bachelorette party cocktail ideas - unique bridal shower shot glasses {Sugar and Charm}

How 'cool' (pun intended) are these frosty shot glasses? Frozen fruits adorn the exterior for the perfect holiday display while keeping your adult beverage extra chill-ay (it rhymed). Highly recommended to start off the night with these festive frosty favorites!

Chill out with your friends and family at your next holiday party with these icy ideas and devour the details of keeping your drinks cold in the coolest ways! Word to your mother.

Monday, October 23, 2017

Monday Mashups: Trick or Treat for these Homemade Halloween Lollipops

Halloween is just a week away! Cue Bow Wow Wow's "I Want Candy". Our sweet tooth is so ready for all the treats coming our way including these homemade Halloween lollipops! These glittery and star-struck sweets not only taste great, but can be made in any color you want and embellished with a touch of edible shimmer.

homemade Halloween lollipops via LaurenConrad.com

Ingredients:
¼ cup + 2 tbsp. water
½ cups sugar
¼ cup tapioca syrup/corn syrup or honey*
1 tsp. extract of choice (Lauren Lowstan used vanilla, grape, strawberry, cotton candy)
Gel food coloring (purple, orange, red, green. (note: you must use gel food coloring here—don’t use liquid).
Edible gold disco dust and gold stars
Nonstick spray

*If you want to make your pops a tad healthier, make them with tapioca syrup or honey instead of corn syrup. If you do use honey, remember it is a strong flavor and will completely flavor your pops.

Instructions:
1. Spray your lollipop molds with nonstick spray. If using the double gold stars, sprinkle a few into each mold cavity.

2. Place the water, sugar, and corn syrup in a small pot set over medium high heat. Whisk to combine and let the mixture come to a boil. Make sure not to whisk or stir the mixture again. Set your candy thermometer into the sugar mixture, and let boil until the temperature reaches 290 degrees.

3. Immediately take off the heat and add in your extract of choice and food coloring. Note: I added quite a few drops of food coloring to get them to a dark fall shade. If you want glitter inside the pops, sprinkle a little bit of disco dust in now.

4. Working quickly, pour the sugar mixture into each mold and top each with a stick. Make sure to work fast so the sugar mixture does not harden on you. If it does harden, you can place it back onto a low heat until melted again.

5. Once the lollipops have hardened, you can pop them out by grabbing them by the stick.

6. You can sprinkle a little bit of disco dust onto the tops of each lollipop if you didn’t add the glitter into the melted sugar mixture.

Halloween lollipops recipe via LaurenConrad.com

Fun and festive, devour the details of these tasty treats and satisfy your sweet tooth with these homemade Halloween lollipops. 

Thursday, October 19, 2017

35th Annual Essex ClamFest

Don't clam up! You can still get your last taste of summer in at the 35th Annual Essex ClamFest this Sunday, October 22nd. The Essex Division of the Cape Ann Chamber of Commerce will sponsor the 35th Annual Essex ClamFest again this year in Memorial Park in Essex from 11-4PM. Essex, Massachusetts offers one-of-a-kind festivals and events for residents and visitors of all ages. In this unique New England setting, discover all that Essex has to offer while attending this fun festival!

Image result for welcome to essex massachusetts

The highlight of the day will be the Clam Chowder Tasting, a competition that pits area restaurants against one another to determine who serves the best clam chowder on Cape Ann. Local restaurants are expected to serve up their favorite chowder recipes starting at noon and ending at about 2PM. Judges of the chowder competition will be announced prior to the event. The public will also have the opportunity to sample and vote on their favorite chowder!


In addition to the endless chowder, you'll find an interesting variety of activities including an arts and crafts area and vendors providing other fabulous food (and fun)! Join the Cape Ann Chamber of Commerce for entertainment throughout the afternoon and visit the Lions Club food pavilion or the many organization, church, and non-profit tables. The crafts area will be open to the public starting at 11AM. Stop by and listen to some live music while getting the last taste of summer seaside!

Image result for woodman's clam chowder

Come enjoy a clamming good time at the 35th Annual Essex ClamFest and devour the details of some of Cape Ann's best chowder all day long!

Wednesday, October 18, 2017

Wedding Wednesdays: Pineing for You

We've never seen a fruit trend catch on as quickly as that of the pineapple. From home decor to children's clothing, you won't have a hard time coming across this sweet treat in its many variations. But did you know the significance of a pineapple? Its true meaning? A pineapple is the international sign of hospitality - a traditional expression of welcome. So it's kind of the perfect symbol to incorporate into your wedding.

Think about it! You're bringing family and friends together to celebrate a momentous occasion while catering to their needs (and yours too of course). What could be more hospitable? But let's not forget that it works as a symbol of love as well. A play on words but throughout your relationship you've been pineing for one another. Pine-ing... pine-apple... the perfect symbol of love and welcome for your wedding day. Here are 5 ways to incorporate this tremendous trend!

Groomsmen Attire

Hawaiian PINEAPPLE Cuff links Gold Cufflinks by NeatstuffAntiques9 Sunset Wedding on Hawaii @weddingchicks

From their cuff links to their socks, this is the perfect way to put a pineapple on display!

S.W.A.P.

Gold Pineapple Wax Seal --- a MUST DO for my pineapple/tropical themed wedding!

Skip sealing with a kiss and go straight for this sensational wax pineapple seal. An elegant touch of your theme!

Significant Centerpieces

Photography: Michelle Lange - www.loveandbemarried.com   Read More on SMP: http://www.stylemepretty.com/2016/01/26//A pineapple vase is the perfect table centrepiece for a summers wedding.

From painted to handmade vases, these pineapples will surely be the center of attention!

Placecard Holders

pineapple wedding ideas - photo by Chloe Murdoch Photography http://ruffledblog.com/romantic-costa-rica-wedding

Welcome guests with these adorable pineapple placecard holders. The perfect token of welcome to take home with them.

Food and Drink

Gold Pineapple CakeYummy pineapple water for a Hawaiian destination wedding: http://www.stylemepretty.com/destination-weddings/2015/08/26/tropical-colorful-wedding-in-kauai-botanical-garden/ | Photography: Heather Cook Elliott - http://heathercookelliott.com/

Since it is a fruit, there are so many ways to incorporate pineapple into your food and drink. This adorable cake and refreshing water are just two ways that peaked our interest!

Now we're pineing for pineapples! Get inspired and devour the details of this trendy fruit as a symbol of your love and hospitality on your wedding day!

Tuesday, October 17, 2017

Palm Read Like A Pro

Instead of hosting a standard Halloween party with costumes and candy, kick it up a notch with some good old fashioned hocus pocus! What are we talking about exactly? The spiritual-side of spooky. Tell your friends to leave their monster masks and cat claws at home, they'll only be needing their palms for this party!

As told by Allison from Team LC of laurenconrad.com, here are a palm reading is simply a reading of what’s happening now, and predictions for your future if you choose stay on this track. Keeping that in mind can help you relax about what a palmist will see or what you will learn about yourself if you read your own palm. And staying relaxed during your experience will make it much more enjoyable.

In this guide to palm reading, Allison shares the five main lines you can look at on your own hand or your friends hand if you want to try palm reading for yourself. So let’s begin! To see your lines clearly as you begin, cup your hand and put under bright light and shift it around from side to side. Ready? Let the fun begin!

the smart girl's guide to palm reading

1. Life Line
Your life line is one of the easiest lines to spot right away. This line starts at the base of your palm and arcs upward circling the ball of your thumb, ending between your thumb and forefinger. Contrary to popular belief, your lifeline actually doesn’t determine how long you will live. Your life line will tell you more about your general well being and your passion for life. This line will also indicate major changes in your life, like moving cities or major physical and emotional events. If your life line is long and unbroken, you are a solid, dependable person who people can rely on. A long, strong unbroken life life also indicated the inheritance of strong, healthy genes. A life line that is pretty straight, without any curve, means that you are cautious when it comes to relationships, and could benefit from instilling more trust in others.

2. Head Line
The head line starts on the outside of your palm, on the side between the crease of your thumb and index finger, and ends in the center of your palm. This line represents your learning style, how well you communicate, and your desire for knowledge. A curved head line indicates creativity, spontaneity, and artistic ability, whereas a straight line represents a more logical, practical and structured approach to learning. A short head line might mean that physical achievements are super important to you—you might have interest in being an athlete or a dancer. A sloped, curved line that connects with the life line represents creativity. A line that does not touch your life line represents an adventurous person. And a deep head line represents being clear, focused and wise—you might be someone who is good at giving advice and should offer it more often. And a straight head line represents someone who is realistic and analytical—you’re a clear thinking and you always think things through.

3. Heart line
The heart line is the line that runs below the base of your fingers and ends at either your middle or index finger. This line will tell you about your emotional stability, romantic life, state of happiness, and the health of your heart. If you have a long, straight heart line that ends under your index finger, you’re a rational thinker with a generally content love life. If you have a short, straight heart line, you value your sense of independence when it comes to relationships and show your love through actions rather than words. If your heart line ends under your middle finger, you are a romantic and fall in love easily. If you have a long, curved heart line that arches up toward your middle finger, you are passionate and freely express yourself and your romantic desires. A short curved line, however, means you are more private about your romantic endeavors. A straight, parallel heart line means you are level headed and realistic about relationships. A broken heart line or a heart line that has other small lines crossing through it may indicate heartbreak or emotional trauma. And a break in your life line indicates that you might have a big change in lifestyle in your future—whether that means moving cities, changing career, changing relationships, or all of the above.

4. Fate Line
The fate line is a vertical line that runs straight up the middle of your palm, from the base towards your middle finger. This line represents how strongly your life will be controlled by your destiny—in other words, how closely you will follow a certain path in life. It can also be called the career line because it indicates your interests and how your career might follow or veer from those interests as you develop. A deep fate line indicates a life that will follow a strong path determined by destiny, which means you might have a strong desire to pursue one career and find success in doing so. This might mean you have a strong ability to start your own business. If your fate line begins joined to your life line, it means you have had a strong path from birth, and that you will continue to follow your interests and possibly pursue a very successful career based on those early interests. You are self-made and have big aspirations early on. If your fate line has a break at one point then continues on, it means you will have a change of career and then continue on with a different career path. Several intermittent breaks mean you will have twists and turns in your career. Don’t have a fate line? Don’t worry—it doesn’t mean you don’t have a career. Absence of a fate line means you might change your career often, or have many different interests you pursue throughout your life.

5. Sun Line
This line, also known as your Apollo line, indicates your talent, popularity and success. It is also called the line of success for that reason. Having a deep sun line means you will be very successful and that may even gain fame through your success. A faint sun line means you are refining your skills and will work hard for the success you want in career and marriage. A very clear sun line indicates good taste in art and literature. A sun line that breaks then resumes its course may mean that you will have great success and recognition after overcoming past experiences. If your sun line is parallel to your fate line, it is a very good sign and means that you could gain huge success and gain a great reputation throughout your life. If you have an absent or short sun line, it means you are a hard worker, but should stop and enjoy life every once in a while to take some time for yourself.

Pretty interesting stuff, right? Remember that none of this is based on science, just interpretation from palmists. So don’t take any of it too seriously! It’s meant to be fun and interesting. If you are interested in diving really deep into more palm reading, this website is a great source for learning about the intricacies of your lines, and other meanings of your hands and fingers. Palm read like a pro this Halloween and devour the details of some serious hocus pocus with your favorite friends!

Monday, October 16, 2017

Monday Mashups: This Day in 2013

It's official! We're 4 years old. Happy blogiversary to us! In honor of this momentous occasion, we thought we'd throw it back to this day in 2013, when we just got started. Fresh out of school and unemployed, we've come a long way since then (and so have our writing skills)! Check out this perfect post on brewing up some love with a date night in the backyard. Enjoy!

What's a great way to impress your significant other? How about taking them on a fairytale date in your own backyard and living room. Tea, macaroons, flowers, and tipis. Have you ever seen anything so romantic?

Table for two? Yes please! Bring out the fairytale element with this simple color palette that will flow throughout the entire date.


Keep the pastels going with the tea kettle and cups. Nothing sweeter than this arrangement.


In addition, these cute marshmallows dipped to look like cupcakes could be used to sweeten the tea. I would even consider changing the marshmallows to sugar cubes and make these tea-stirrers.


After your relaxing cup of tea, take it inside to this cozy tipi setup for some snuggling.

I hope this post gives you the ability to devour the details on your next date!

Thursday, October 12, 2017

Wachusett Mountain AppleFest

In 1969, Ralph Crowley was awarded the lease from the state to operate Wachusett Mountain. Located within the Wachusett Mountain State Reservation, the well-known local ski attraction operates in cooperation with the Massachusetts Department of Conservation and Recreation, providing skiing and snowboarding on 100-acres of terrain within a 450-acre lease area. Wachusett Mountain has a long history of tourism on the mountain. The first hotel was constructed on the summit in 1882. Over 600,000 people visit the mountain year round with at least half of that number visiting the Wachusett State Reservation in the summer and fall.

Image result for wachusett mountain

During the off-season, the ski destination holds a number of events including their annual fall AppleFest. It is Wachusett Mountain's longest running and most popular fall festival and it is back again celebrating its 34th year this weekend, October 14-15 in Princeton, MA. AppleFest features over 150 craft fair & farmers' market booths, family entertainment, scenic foliage skyrides to the summit, mountainside barbecue, pony rides, clowns, a climbing wall, jugglers and magicians for the kids. AppleFest also features a Celtic celebration complete with authentic Celtic music, cuisine, a multitude of delicious brews in the beer garden along accompanied by live music. It's no wonder this event has been around nearly 3 and a half decades!


Here's a peek a the Schedule of Events:
  • Live Music from 10:30-4:30 all weekend by the Worcester Kiltie Pipe Band
  • Dance Performances daily at 11:30 and 12:30 by McInerney Irish Dance and at 2:30 and 3:30 by Flying Irish Studio
  • Great New England Apple Pie Contest Saturday, October 14th
  • Giant Pumpkin Weigh-Off Saturday, October 14th
  • Cider House 5K Sunday, October 15th
  • Blueberry Pie Eating Contests All Weekend Long
Ticket prices vary by age and package:

Standard
Adults (12yr and up)
$11 Advance, $14 Door

Children 6-12
$6 Advance, $9 Door
*Children 5 & under are FREE

Admission PLUS (Admission plus one trip on the SkyRide)
Adult: $19 Advance, $22 Door
Ages 6-12: $12 Advance, $17 Door

Festival Package (Admission, one SkyRide and a $10 Food Voucher)
Adult: $24 Advance Only
Ages 6-12: $17 Advance Only

For more information, visit the Wachusett Mountain website.

Join us this weekend in celebrating another year of AppleFest and devour the details of all Wachusett Mountain has to offer during its off-season. See you there!

Wednesday, October 11, 2017

Wedding Wednesdays: Oh My Gourd

Fall activities are in full effect! Pumpkin picking, pumpkin carving, baking with all things pumpkin. But if you're getting married this season, it's also the perfect time to incorporate pumpkins into your wedding decor. Here are some fabulous fall ideas that'll have your guests saying "oh my gourd, how cute!" on your special day!

Aisle Decor

White pumpkin aisle decor

Line your aisle with a few pumpkins in varying sizes and colors for ceremony decor. Consider punching holes or carving a minimalist design into the pumpkins and adding candles for totally efficient and seamlessly integrated lighting. If you're going for a more understated look, arrange mini pumpkins with bunches of flowers or candles, so you get a hint of the season without allowing it to steal the show.

Mr. and Mrs. Pumpkins

Mr and Mrs decorated pumpkins for fall wedding ceremony

Perfect to use in any photo opp, this duo is timeless! Consider crafty, no-carve alternatives like washi tape, push pins, rhinestones, burlap, lace or glitter. And take full advantage of the stalk—tie something fun around them for a more bridal look, like white tulle or strips of lace.

Escort Card Table

Mini pumpkin escort card displays

Almost functioning as a paper-weight, you won't have to worry about these escort cards flying away! Whether you paint them or stick with their natural coloring, this petite pumpkins are sure to make a great display. Either tie some "leaves" around stalks with names on them or cut a little slit into the top of each pumpkin to slide the escort card into.

Centerpieces

Fall themed centerpiece pumpkin wedding decor

With or without flowers, this pumpkin patch-inspired look really ties in to any fall theme. Placing a cluster of little pumpkins on a pedestal fancies them up a little bit, but still keeps the tabletop looking casual. If you want to go the flower route, hollow out a bigger pumpkin and use it as a vase. Both are understated yet stunning!

It's never easy picking the perfect pumpkin but picking how to incorporate it into your wedding day definitely seems a lot simpler! Get inspired by these gourds and devour the details of your decor this fall!

Tuesday, October 10, 2017

Hauntingly Good Halloween Cocktails

Happy Boos-day! How punny?! If you couldn't tell, we're getting really excited for Halloween over here. This year, we're planning on staying away from all the candy but cocktails are definitely not off limits! Here are three lovely libations for every guy and ghoul celebrating the spookiest day of the year. Cheers!

Passionfruit Mar-ghoul-ritas

the cutest spooky cocktail for Halloween

Ingredients:
passion fruit juice
sparkling water (or get a little crazy with coconut flavored La Croix)
2 limes
sea salt
tequila
sour candy gummy worms
ice cube tray

Instructions:
1. For the gummy worm ice cubes: Fill your ice cube mold with water then place your gummy worms strategically into each ice cube mold. Let freeze for 2-4 hours or until completely frozen.

2. Then, start off by salting your margarita glasses. Lightly wet the rims of your glasses by sliding a sliced lime around them. Then, pour your sea salt onto a small plate and twist the rim of your glass into the salt, so that the salt sticks to it completely.

3. Mix together 2 parts passion fruit juice, 1 part sparkling water, and 1 part tequila.

4. Squeeze the juice of the whole lime evenly into each glass. Slice the other lime into wedges or slices and use as garnish.

5. Remove your gummy worm ice cubes from their molds and place into each drink for a spooky touch.

Who doesn't love a good mar-ghoul-rita? Not to mention, Halloween is on a Tuesday this year, so tacos should definitely be on your agenda to accompany this cocktail!

Hocus Pocus Spritzer

DIY Spider Swizzle Sticks via LaurenConrad.com

Ingredients:
berry flavored sparkling juice
1 ½ ounces vodka
4 fresh blackberries, muddled
juice from one lime
1 ½ ounces prosecco
Bon Puf cotton candy for garnish
eyeball candy for garnish

Instructions:
1. In a cocktail shaker, add the vodka, sparkling juice, prosecco, blackberries and juice from one lime. Muddle the blackberries, then add ice. Shake well until combined.

2. Pour into highball glasses and top off with extra muddled blackberries if desired.

3. Pull apart cotton candy so that it becomes nice and wispy. Place around the rim of each glass. If you can’t get it to stay in place, moisten the rim of the glass with a tiny bit of water and it should stick.

4. Place spooky eyeball candy (or festive sprinkles) around the cotton candy to garnish. For an extra frightening decoration, drizzle the cotton candy with the cocktail mixture and watch it melt!

Inspired by our favorite witches, this cauldron-esque cocktail is perfect for any party!

Boo-Berry Moscow Mule

boo-berry moscow mule

Ingredients:
ginger beer
vodka
1 small carton of blueberries, about 10 berries per drink
fresh mint sprigs
4 limes
crushed ice
floating plastic eyeballs

Instructions: 
1. First start by muddling the blueberries in each cup. Pour about ½ a bottle of ginger beer into each Moscow Mule cup, then place about 10 berries into each cup. Using a pestle, crush the blueberries into the liquid until they are smashed and the juice of the berries is mixing with the ginger beer. If you don’t have a pestle, a fork or spoon should work as long as you can crush the berries with it.

2. Then, pour about 1 shot of vodka into each glass (or more if you prefer stronger). Pour ginger beer into each cup until just about 2/3 full, and top off with the juice of half a lime in each. Stir until mixed thoroughly.

3. Fill the remaining third of each glass with crushed ice. Add a sprig of mint, a lime wedge and a blueberry or two on top for garnish. And don’t forget your spooky floating eyeball for the final BOO-berry effect!

A real treat for any tricker to serve up!

Image result for drunk skeleton

Create a whole drink menu with these boos-y beverages and devour the details of a ghoulishly good time with your friends this Halloween!

Monday, October 9, 2017

Monday Mashups: From Gore to Glamour

Planning a fundraiser near Halloween but want to steer clear of the stereotypical ghoulish decor? We've got an interesting theme for you. Inspired by the Body Worlds: Pulse exhibit, this event takes you on a journey through the human anatomy in what at first glance may seem gory but at a closer look is actually quite glamorous. Perfect for an upscale party that takes place around the spookiest day of the year. Check it out!

<p> Body-painted models performed poses similar to those found in the California Science Center's new exhibit, "Body Worlds: Pulse." It...

Every year in Los Angeles, the California Science Center hosts its annual Discovery Ball with an all-encompassing theme that draws from the museum’s newest exhibit. This year, that format set the stage for a gala with an anatomical look and feel. The museum’s event services department headed up the production and design for the 19th annual Discovery Ball, which featured the premiere of the new summer exhibit, “Body Worlds: Pulse.”

<p> Performers from the Debbie Allen Dance Academy led guests through the rose garden to dinner.</p>

About 800 guests started out the evening of May 19 at a nervous system-theme cocktail party amid Lucent Dossier's living plastinates (preserved bodies); these fully anatomically correct, body-painted models performed poses similar to those found in the exhibit. Aerialists and contortionists also performed above and in the reflection pool, meant as demonstrations of the complexity and beauty of the human body, under a balloon sculpture installation that resembled red blood cells. Can you imagine walking into a room and seeing these sites? Totally spooky in more of a getting caught-off-guard way!

<p> A balloon sculpture installation resembled red blood cells overhead, and aerialists performed throughout the red-dominated space.</p>

After cocktails, guests were invited to use their locomotive systems to propel themselves through the City of L.A.’s historic rose garden, while a dozen performers from the Debbie Allen Dance Academy led the way to dinner. Aptly themed around the digestive system, dinner within the Science Center’s Samuel Oschin Pavilion (which famously features the space shuttle Endeavour) offered short ribs and anatomically correct chocolates as mignardises. Linens were meant as eerie resemblances to muscle tissue samples under a microscope. They definitely thought of everything!

<p> Mindride created two customized interactive stations at the event: The team created an electronic avatar of the museum’s president...

After dinner, guests were invited to work their circulatory systems at an after-party, which included a dessert buffet with anatomically inspired offerings, while a custom-made pulsing heart hung overhead. The party also featured anatomically correct heart-shape popsicles and a giant tabletop version of the game “Operation.” A haunting way to raise money but this function definitely exceeded attendees' expectations!

<p> The body-parts theme continued from the cocktail portion of the gala straight through to dinner and the after-party.</p>

The event surpassed its fund-raising goal for science camp scholarships: $230,000 and overall, took in about $1.4 million. What a way to devour the details of a hallow's eve fundraiser without getting too ghoulishly carried away. Let us know how you tackle spook factors at celebrations near the 31st (without buying every decoration from the party store) in the comments section below. We'd love to hear your ideas!

Thursday, October 5, 2017

Bone Up Brewing and Fat Boyfriend Bakery

Bone Up Brewing is the Boston area's smallest brewery! Husband-and-wife brewing duo Jared and Liz Kiraly crank out fresh new beer every week from their 3-barrel nano brewery and taproom. Inspired by old-school Belgian farmhouse brewing while celebrating American styles, their ales combine the heart and soul from each of these beloved beer cultures. Four year-round beers are always available, but the gears of Bone Up are always turning, so you can expect an ever-changing array of one offs, seasonal releases, and experimental batches.


Located in the heart of Everett's budding Fermentation District, the taproom is open Thursday through Sunday and features full pours, flights, and growlers from ten rotating tap lines. In addition to a weekly cask, the taproom hosts games and an ongoing series of food trucks and pop ups. This Saturday, October 7th, Fat Boyfriend Bakery will be delivering their infamous hand pies to the mouths of those having a Bone Up beverage!


Fat Boyfriend Bakery was started as a farmer’s market stand back in 2013. It’s since grown from there and they are now baking out of the wonderful facilities of Stock Pot Malden. They're proud to offer their baked goods to different restaurants and cafes throughout the metro Boston area, including their reoccurring gig at Bone Up Brewing. Their tentative menu for this weekend includes pulled pork, tomato and cheese, and apple crisp hand pies!

Picture

Come deliver some deliciousness to your mouth, no utensils required, this Saturday and devour the details of this perfect pairing at Bone Up Brewing. Cheers!